Being able to block emails on Outlook is like a superpower.
We’ve all been there – the never-ending stream of unwanted emails cluttering your inbox. Fortunately, Outlook provides powerful tools to help you take control of your email flow.
In this comprehensive guide, we’ll cover:
- Different methods to block emails on Outlook.
- How to manually add a sender to your blocked list.
- How to manage your blocked and safe senders lists.
Let’s explore.
Why Block Emails on Outlook?
Managing one’s inbox effectively is crucial for both productivity and peace of mind.
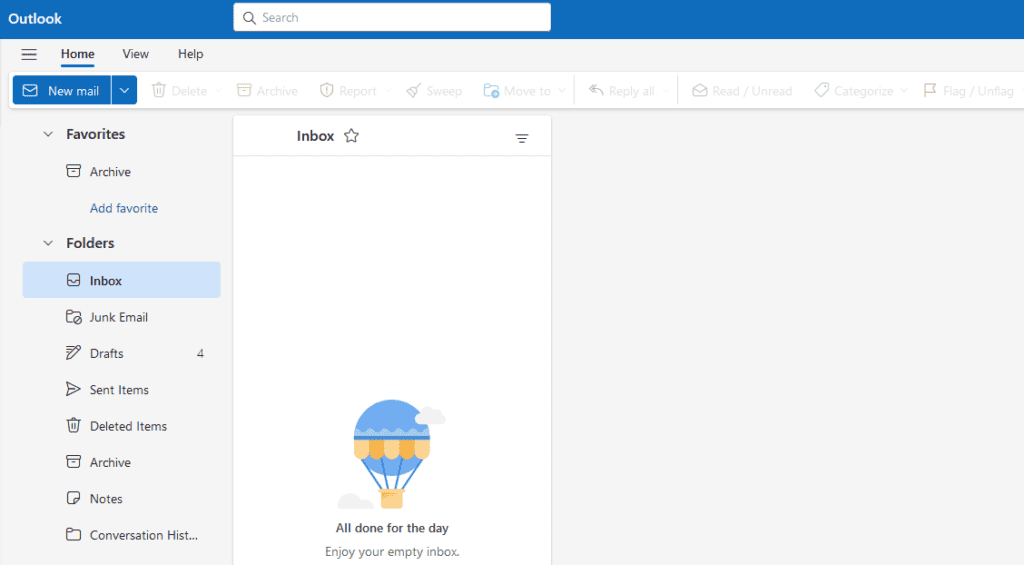
Outlook is one of the most popular email clients. As a part of the Microsoft suite, most companies use it as their default. It offers a range of features to help you optimize your work experience, and one such feature is the ability to block unwanted emails. But why is blocking emails in Outlook important? And what happens when you block a sender?
Blocking emails in Outlook is the fastest way to shield yourself against spamming, phishing, and unsolicited messages. When you block a sender, several things occur:
- No Notification to the Sender: The sender is not notified that they’ve been blocked. From their perspective, their emails simply go unanswered or unnoticed.
- Blocked Emails end up in your Junk Folder. This is specific to Outlook. Some other email clients prevent emails from blocked senders from reaching your inbox entirely. However, in Outlook, future emails from the blocked sender are automatically diverted to your Junk Email folder, keeping your primary inbox clutter-free. After 14 days, emails are automatically removed from the Junk Email folder. After that, they can’t be recovered.
So, let’s explore a few different ways you can block emails on Outlook.
Option 1: How to Block Individual Emails on Outlook
Let’s start with the basics. Suppose you open an email, and you immediately identify it as spam.
Here’s what you can do.
Firstly, select the unwanted email by opening it in your inbox. Next, navigate to the Home tab located at the top of your screen. Now, click the “Report” drop-down menu. Here, you can either choose to mark the sender as “Phishing” or “Junk”:
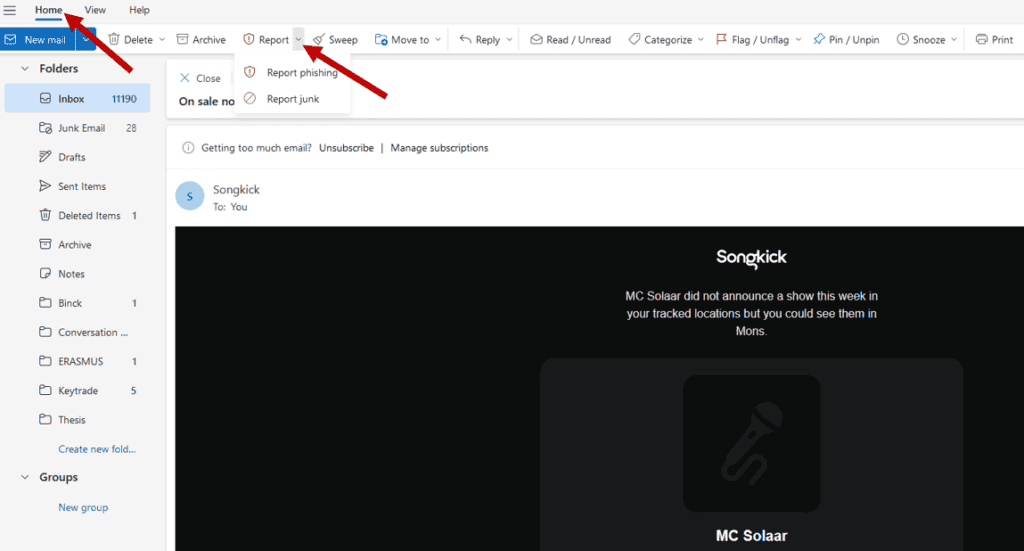
- Junk: the email will be sent to your Junk email folder
- Phishing: the email will be sent to the Deleted Items folder.
Choose the appropriate option, and click on it. This will automatically send any future emails from this sender to the appropriate folder.
Congrats! You’ve just blocked your first email on Outlook!
Option 2: How to Block Emails on Outlook From Your Inbox
Want an even faster way to block a sender forever? For example, if you have been receiving incessant promotional emails from an online store you’ve never shopped at?
With this method, you can block an email without even opening it. Here’s how you can do it.
Firstly, find the unwanted email in your inbox, right-click on it, and a drop-down menu will appear.
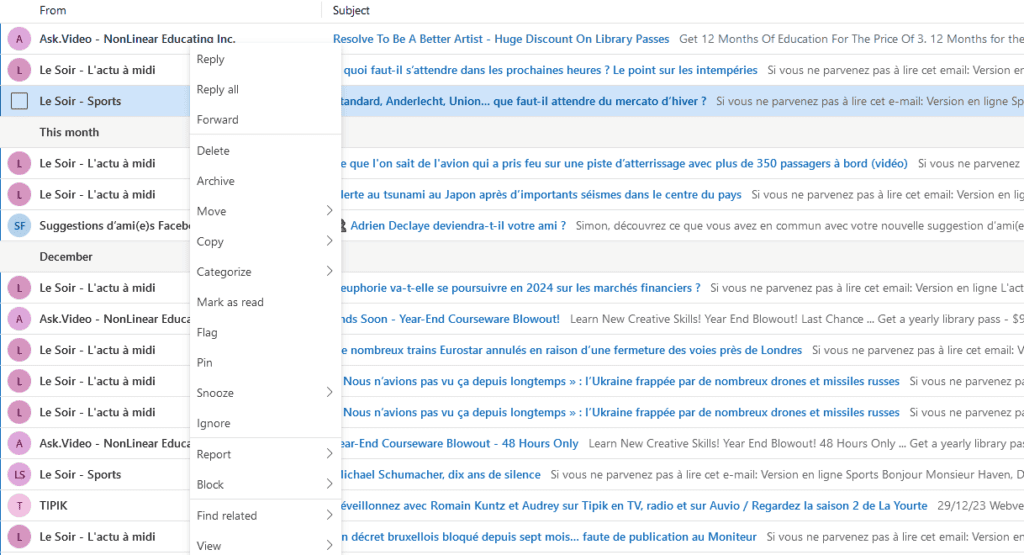
Next, hover over “Report” in the menu, and another drop-down will appear. Finally, choose either “Report phishing” or “Report junk”.
Option 3: Blocking Emails on Outlook by Blocking a Sender
By blocking a sender, all emails from that sender are directly sent to your Junk folder.
To block a sender from an email, you have two options:
- Right-click on an email from that sender, and select Block > Block Sender in the drop-down menu.
- Under the “Home” ribbon, navigate to the 3-dots drop-down menu and select Block > Block Sender.

With this method, you have blocked the sender indefinitely. This means all future emails from this sender will be sent to your Junk folder.
Option 4: Manually Blocking Senders
One last option that is available to you is to block emails on Outlook manually.
To do this, navigate to the Outlook Settings. Under the Mail tab, select Junk Email.
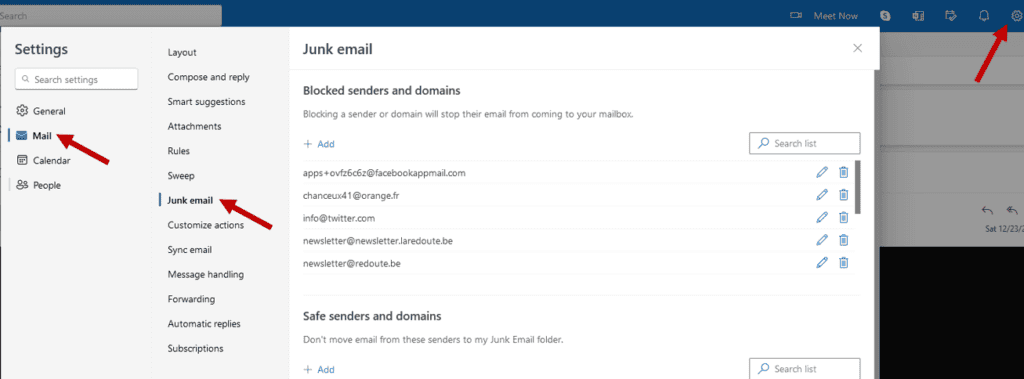
Select “Add”. Next, enter the email address you wish to block.

Finally, press Enter, then click Save at the bottom of the window.
The great thing about this method is that you can also block an entire domain. This can come in handy if you are receiving spam from several email addresses with the same domain name.
Option 5: Unsubscribing From Lists
Finally, let’s explore one last method to block emails on Outlook. However, this method will not work with all types of senders.
In most cases, when people want to block emails on Outlook, a simple “Unsubscribe” is enough.
The truth is that most emails people want to block come from newsletters they have subscribed to. Sometimes, these subscriptions are explicit when you sign up or purchase a product. Sometimes, they are hidden when you download something as simple as a PDF.
In any case, these subscriptions can accumulate over time, making your inbox a mess. The best way to tackle this problem is to simply unsubscribe from each newsletter. Legally, there should be a mention at the bottom of these emails providing that option.
This also avoids legitimate businesses to be marked as spam.
Once you click on the link, you should land on the sender’s website. At this stage, you may have an additional option to unsubscribe from specific newsletters. If you want total peace of mind, select all newsletters and validate.
If the sender does not provide an “Unsubscribe” option, you can also choose to unsubscribe directly from Outlook.

Obviously, this technique will not work if you want to block emails from actual spammers on Outlook. However, this can help declutter your inbox massively.
Managing Blocked Senders
Over time, you may block several senders. To ensure you’re only blocking those you genuinely don’t want to hear from, regularly review and update your blocked senders list.
Here is how you can manage your blocked senders list:
- Go to the Outlook settings
- Select Mail > Junk Email
- Here, you have a view of all blocked addresses and domains. From here, you can add or remove entries as needed.
This is also where you can decide to unblock senders. Indeed, blocking senders is reversible.
If you’ve blocked someone but later decide you want to receive their emails again, return to the Blocked Senders tab. Navigate next to the sender you want to unblock and click on the dustbin icon to remove them from the Blocked Senders list. Make sure to hit Save when you’re done.
Additional Notes
It’s important to note that you can only block a certain amount of addresses. More specifically, you can add up to 1024 addresses or domains in both the blocked and safe senders lists.
Technically speaking, you can also create filter rules. These are rules that will automatically send emails to a specific folder based on:
- the sender
- keywords in the subject line
This method is great for keeping your inbox organized (based on current projects, professional vs. personal, etc.). However, it is more complex and provides no specific advantage compared to direct blocking. One fringe case might be to block a sender based on targeted keywords in the subject line (as a sort of parental control).
Final Words
Blocking unwanted emails in Outlook is an essential skill for maintaining a clutter-free inbox. It’s not just about tidiness; it’s also about improving your email security and reducing exposure to spam and phishing attempts. With these simple methods and tips, you can take control of your digital communication and make your email experience more productive and enjoyable.
Interested in stepping up your online security and privacy? Create a free Mailfence account today. And if you want to learn more, check out our 6 tips to preserve your privacy online!
