

You may have come across the term “digital signatures” online. You may even have digitally signed emails or documents yourself. However, a digital signature is not the same as an electronic signature.
While an electronic signature can be as simple as a PIN, a digital signature employs cryptographic methods to verify the author’s identity and ensure the document’s integrity
In this guide, we will cover everything you need to know about digital signatures, including:
- what a digital signature is;
- what sets it apart from electronic signatures;
- how to send your first digitally signed emails;
… and much more! So without further ado, let’s explore.
What Is a Digital Signature?
First things first, let’s define what a digital signature is.
A digital signature is a type of electronic signature that uses cryptographic techniques to verify the signer’s identity and ensure document integrity.
In a sense, a digital signature is a “virtual fingerprint”. Once applied, it can either be an embedded part of the document or exist separately.
Digital signatures serve three essential roles:
- sender verification: the sender is who they claim to be;
- integrity: the message was not altered during transit;
- non-repudiation: the sender cannot deny having sent the message, depending on the type of digital signature.

This makes digital signatures more secure than handwritten signatures. This is because there is no reliable way of verifying a handwritten signature, much less a way to know if the document was not tampered with.
Handwritten signatures are unique to every person (handwriting style, speed of writing etc.). However, once a signature is put to paper, it is easily forgeable with tracing paper.
Handwritten signatures therefore pose a repudiation problem. One can simply claim that someone copied their signature, and it would be difficult to prove otherwise.
This is why we need digital signatures 👇
Digital Signature and Electronic Signature: What’s the Difference?
We mentioned earlier that a digital signature is a type of electronic signature. It’s important to differentiate between those two properly, as not every e-signature is automatically a digital signature.
An electronic signature is any type of expression, not just a signature itself. It can be a PIN code, password, or even a simple image of your signature:

Here’s a quick comparison between electronic signatures and digital signatures:
| Feature | Electronic signature | Digital Signature |
| Purpose | Verifying the document | Protecting the document |
| Verification | Cannot be verified | Can be verified |
| Third-party regulation | Can be subject to varying regulations based on jurisdiction (such as eIDAS in the EU or the ESIGN Act in the US). | Legal standing is given, depending on jurisdiction, by the level of assurance provided by the cryptographic techniques and protocols used (such as Qualified Electronic Signatures under eIDAS). |
| Cryptography | Doesn’t use cryptographic algorithms | Created using cryptographic algorithms |
| Advantage | User-friendly (but no data security) | Provide data security features using cryptographic methods |
How Do Digital Signatures Work?
We’ve now established what a digital signature is, and why it is a superior form of electronic signature.
Let’s now dive into how they actually work.
Firstly, a digital signature only requires the sender (the signer) to have cryptographic keys (a private key and a public key). The sender signs the message locally on their device (using their own private key). The receiver then verifies it on their device using the sender’s public key. The process works as follows:
- Alice (sender) generates a key pair and shares her public key with Bob (a one-time pre-requisite).
- Alice signs the message using her private key on her device and sends the message to Bob.
- Bob receives the signed message on his device and verifies the signature using Alice’s public key.
Make sure to check out this guide on private and public keys if you need a refresher. There are also digital signatures that can be generated using cryptographic algorithms that are classified as symmetric.

Digital signatures on a technical level
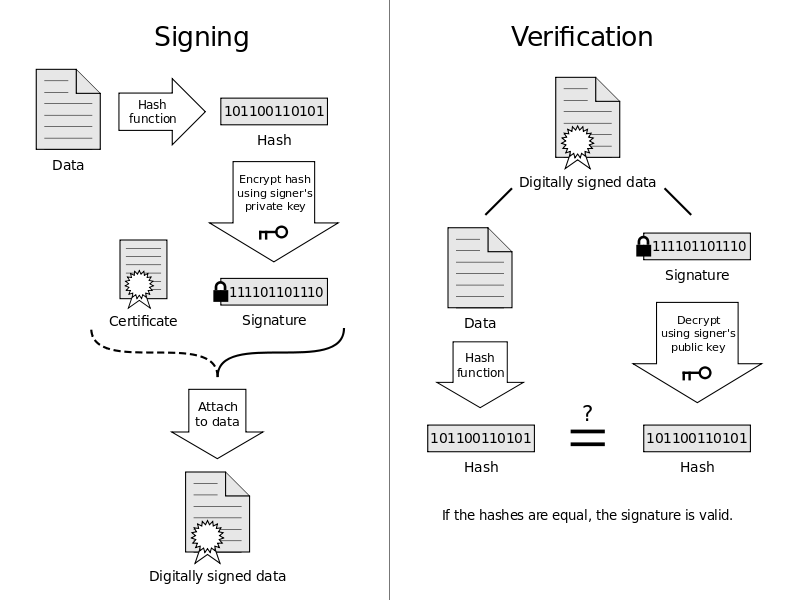
On a more technical level, sending a digitally-signed email will follow these steps:
- signing starts with taking a cryptographic hash of the original message;
- the hash is encrypted using the sender’s private key and sent along with the original message.
- the recipient receives both the original message and its encrypted hash;
- recipient then decrypts the encrypted hash using the sender’s public key and matches it with the hash of the original message;
- if both of the hashes match, the digital signature is verified.
To fully understand how digital signatures work, we need to get a little technical. Specifically, we need to discuss two different common models they are based on.
The first one is PKI or “Public Key Infrastructure“. This means that the public key that Alice was using to sign her message to Bob has to be certified by a CA or a “Certificate Authority” (such as Verisign).
In other words, the CA vouches for the key, and the key validates the sender – making the CA a trust anchor.
However, a centralized authority (i.e. Certificate Authority) can not always be trusted (e.g., due to sociopolitical reasons) or can be compromised.
An alternative trust model is Web of Trust or Pretty Good Privacy (PGP).
In the “web of trust” model, each user has a set of “trusted” public keys that verify the sender to the recipient, instead of everyone relying on a single CA.
Are Digital Signatures the Same as End-to-End Encryption?
Although the concepts are similar, they are not the same.
Using public key cryptography, the most notable difference is that with end-to-end encryption, both parties need their own private/public key pair. However, you can send a digitally signed email to somebody who hasn’t generated a key pair.
Here’s a quick summary:
| End-to-end encryption | Digital Signatures |
| Used to encrypt sensitive information in an email or document | Used to verify the authenticity and integrity of the document or email message |
| The recipient’s public key is used to encrypt the data in the email or document | The sender’s public key is used to verify the signature |
| The private key is used to decrypt the data in the email by the recipient | The private key is used to sign the document by the sender |
If you want to dive deeper into end-to-end encryption, check out our comprehensive guide.
However, digital signatures can be combined with end-to-end encryption. This provides increased security, as we’ll explore in the following section.
How to Send a Digitally Signed Emails
Now that you know what a digital signature is, how do you send one?
The exact process will differ with each email provider. To get started, the easiest is to create a free Mailfence account and follow these steps.
First, generate your key pair, and share your public key with the recipient. Next:
- on our web interface, compose your email and enter the recipient’s email address. Then, click the dropdown arrow next to “Send”, and select “Sign and Send”. Enter your password, and click OK.
- on our mobile app, when composing a message, tap the “Lock” icon at the top-right of the screen. Select “Signed with OpenPGP”.
That’s it – it’s that simple!
By the way, if you haven’t yet, make sure to download our mobile app on the App Store or Google Play store!
As mentioned previously, you can combine E2E encryption with digital signatures. This provides increased security to your communications. With Mailfence, if you decide to E2E encrypt your email, it will also be automatically signed:

Digital Signatures Best Practices
Before wrapping up this guide, let’s go over some best practices when sending digitally-signed emails.
Tip #1: Use digital signatures when sending emails
Digitally signing emails with attachments reassures the receiver of the email. In addition, this assures that both the content and the attachment have not been tampered with during transit. This increases the legal value of the email.
Tip #2: Use a strong key when digitally signing
Use a 4096 bit (or at least a 2048 bit) length-based private key to sign a digital message. Mailfence always generates a 4096bit RSA key by default.
Tip #3: Use a sub key when signing
We’ve covered in this guide how encryption and signing are two different operations.
Therefore they demand two different key management approaches. You may want a signing key to be valid for a long time so people around the world can verify signatures from the past. As for your encryption key, you will want to rotate it earlier and easily revoke/expire the old one.
Hence, keeping your key-pair externally as a ‘master keypair’ (for e.g., in a flash drive) and using a sub-key as a ‘local key’ for signing messages is a good practice.
This good article provides a list of steps that you should follow to achieve this using GPG. You can then import that local keypair in your Mailfence account keystore to use it seamlessly around all of your devices.
Note: 1) Keypair containing only sub-keys (for signing and encryption) and a dummy private key packet (a GNU extension to OpenPGP) may not be supported by all OpenPGP-compliant programs. 2) Keeping the primary secret key on removable media makes signing (or certifying) other GPG keys problematic since the primary secret key must be loaded in order to do the signing. 3) Using expiration dates with the subkeys (recommended) means that the subkeys must be extended prior to expiration, or new subkeys issued if they are allowed to expire. 4) Also, people who use your public key (i.e., to verify something you have signed) may receive errors about your key being expired if they do not regularly update their GPG keyrings with public key servers.
Tip #4: Ask friends and colleagues to sign your public key
Having trust signatures on your key will enhance its legitimacy. Ask your friends/colleagues to sign your key. You should sign their public key in exchange.
Alternatively, keybase.io is an operational model that maps your identity to your public keys, and vice versa.
Tip #5: Sign your message for each of your recipients
Yes, include the sender and recipient(s) email address with timestamps in your digital signature! (by adding it to the body of the message). You can also use a service that provides sufficient protection against replay attacks (nonce, session tokens, timestamp, etc).
Tip #6: Pay caution while forwarding a digitally signed message
Let’s take the case of a digitally signed message by Alice to Bob now forwarded to Carol. Only the identity of the original sender: Alice is proved to the recipient. No assumption can be made by Carol that Bob who forwarded the message is the owner of the digital signature/or is the right sender of the message. Unless the forwarded message is signed by Bob himself.
Tip #7: Check the fingerprint of your sender’s key in advance
If possible, get the fingerprint of your sender’s key in advance (preferably in person) – or if your sender is a known figure, by doing an online search.
Additionally, always verify the keypair used for signing a message with the fingerprint.
Automatic verification (matching decrypted hash with the hash of the original message) is one thing. But it will not protect you from impersonation attacks, where an attacker may create a fake identity of the sender and use it to fool the recipients. Thus, a fingerprint should always be your sole cryptographic factor for verifying the public keys of all your senders.
Tip #8: Make sure the signing key hasn’t been revoked or expired
Make sure the key that has been used to sign a particular message is not revoked or expired! This is a big one! Applications often fail to display this clearly to the user. At Mailfence, every such case is timely and properly displayed.
However, if the signing of a message happened before the expiration/or revocation date of the signing key – the digital signature remains valid.
Tip #9: Export messages with digital signatures on them locally
Since account compromises are more common these days it’s better to keep a local copy of messages of high importance or value by exporting them to your machine.
In addition, you can improve their security by locally encrypting them as well.
Tip #10: Legal value of digital signatures
A digital signature can hold someone accountable as the author of a specific message. However, its exact legal validity depends on the jurisdiction where it was created and the applicable local laws.
Before using digital signatures in a legal context, users must agree on certain terms. One critical issue involves the possibility of the signer’s private key being compromised. In such a case, parties must determine whether the compromise was genuine or deliberate.
Note: if you don’t want non-repudiation in exceptional cases, then use deniable authentication based schemes!
Last Word on Digital Signatures
This wraps up this guide on digital signatures!
OpenPGP digital signatures are popular because they simplify the process of managing the sender’s public key, removing the need for validation by a centralized certificate authority, unlike PKI. At Mailfence, we’ve made the process of digital signing very simple. If you use the above-mentioned OpenPGP digital signature best practices, you will further leverage your usage of digital signing.
Digital Signatures: What Are They? FAQ
A digital signature is a type of electronic signature that uses cryptographic methods to verify the sender’s identity and ensure document integrity. It works by encrypting a cryptographic hash of the message with the sender’s private key, which the recipient can verify using the sender’s public key.
An electronic signature can be as simple as a PIN or image of a handwritten signature, while a digital signature employs cryptography to ensure security. Digital signatures offer identity verification, integrity, and non-repudiation, making them more secure than basic electronic signatures.
Yes, digital signatures can complement E2EE by ensuring message authenticity while E2EE encrypts the message content. Mailfence combines these features to provide maximum security in email communication.
Digital signatures authenticate your identity, protect the integrity of your messages, and provide legal value by ensuring that the content hasn’t been tampered with. This makes them an essential tool for secure communications.


