Ah, “inbox zero”—that elusive dream we all chase. It’s almost like reaching the top of Mount Everest, except Everest doesn’t get more emails every 10 minutes. And while actually hitting inbox zero might feel like a fantasy, email filters can get you pretty close.
Think of email filtering as your inbox sherpas, helping you clear the path and manage the never-ending stream of messages.
In this guide, we’ll cover everything you need to know about email filtering: what it is, how it works, how to create your first filters, and our best tips to boost your productivity using filters.
What is Email Filtering?
First things first – let’s define what email filters are.
Email filtering is the process of performing an automatic action on an email based on a rule you set.
So, on the one hand, we have a rule. This can include criteria like the sender’s address or specific words in the subject line.
On the other side, we have the automatic action. This is the reaction that is triggered when the rule is met. For example, it could be to move the email to a specific folder. Or to delete it outright. Or to assign it a specific tag.
Let’s look at an example I created on my Mailfence account:
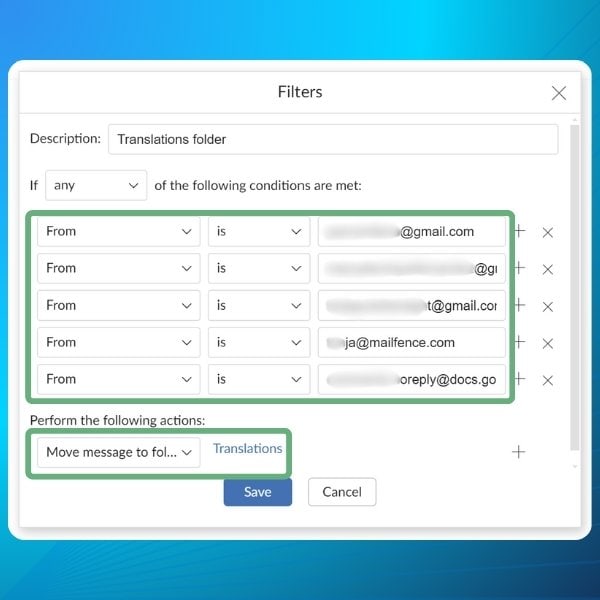
In this example, I’ve created a single filter called the “Translations folder”. This filter helps me stay organized with the translators who work for the Mailfence blog:
- In the rule section, I’ve set the logical parameter to “any”. This means that if any of the following conditions are met, the action will be performed. Then, I chose the “From” field, then listed the email addresses of the translators.
- In the action section, I’ve asked the filter to “Move messages to the folder “Translations”.
Now, any email that I receive from one of these email addresses will be automatically moved to the folder “Translations”!
As you can see, email filtering allows for better control over your inbox. Not only that, but it also saves you tremendous time by automating tasks for you. Let’s look at some of the benefits of email filtering more in detail.
Benefits of Using Email Filtering
Email filtering brings a range of advantages:
- Saves Time: Automating email management reduces manual work, allowing you to focus on important tasks.
- Improves Organization: Emails are sorted into relevant folders or categories, helping you maintain a clean inbox.
- Reduces Distractions: With less clutter, you can better focus on essential messages.
- Boosts Security: Filters can be set to divert spam or phishing emails, protecting your inbox from harmful content.
- Maximizes Productivity: By automatically prioritizing critical emails, you ensure important messages are front and center.
Let’s now look at how to create email filters in the most common email services.
How Do I Create an Email Filter?
Below is a guide on how to create email filters in some of the most five widely used email services.
1. Outlook
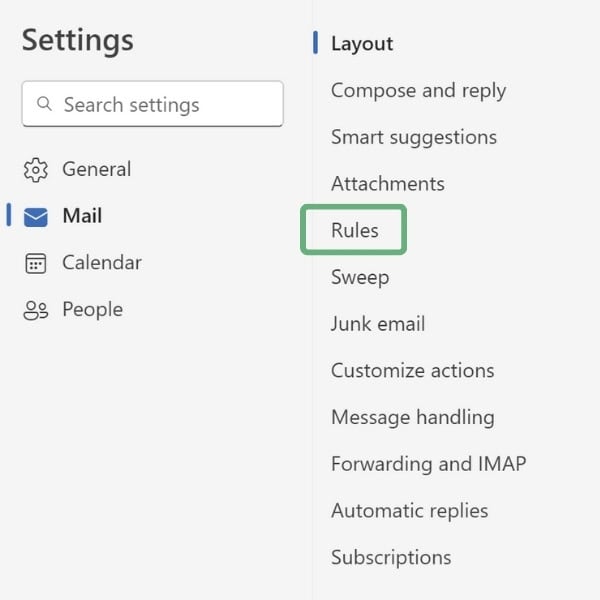
In Outlook, email filters are known as “Rules.” Here’s how to create one:
- go to “Settings” by clicking the gear icon at the top-right of the window;
- under “Mail,” click “Rules.”
- click on “Add New Rule”;
- name your filter, then define the conditions for your filter (e.g., sender, subject line);
- choose an action, such as moving the email to a folder or marking it as important. Then hit “Save”.
Note that you can add multiple conditions in Outlook. However, you cannot set a logical parameter such as “OR” between conditions; by default, all conditions need to be met.
2. Gmail
Setting up filters in Gmail is straightforward:
- click the gear icon at the top right, the “See all setting”;
- select “Filters and blocked addresses”;
- click on “Create a new filter”, and a window will open up;
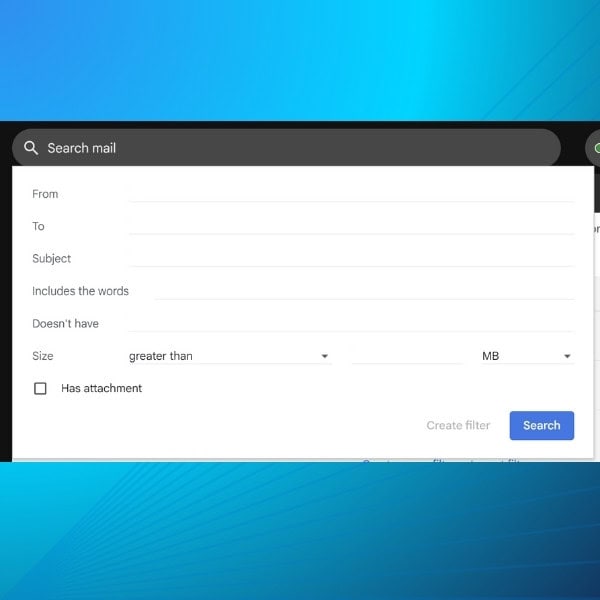
- Define the criteria, such as the sender or specific words in the subject.
- Click “Create filter,” then select what action you want applied (e.g., archive, label, or mark as read).
- Hit “Create filter” again to finalize.
Note that we do not recommend you use Gmail, or any Google service for that matter.
3. Yahoo! Mail
To filter emails in Yahoo! Mail:
- Go to “Settings” and then “More settings.”
- Under “Filters,” click “Add new filter.”
- Define the conditions (e.g., sender’s address) and the action (e.g., move to a specific folder).
- Click “Save” to enable the filter.
4. Apple Mail
Creating filters in Apple Mail:
- Navigate to “Preferences” and then “Rules.”
- Click “Add Rule” and specify the criteria (e.g., subject or recipient).
- Choose an action, such as moving the email or marking it as read.
- Click “OK” to save.
5. Mailfence
As one of the most private and secure email providers, Mailfence offers comprehensive email filtering options. To create a filter:
- click on your username at the top right, then select “Settings”;
- under Messages, select “Filters”;
- click “Add filter”;
- select from the wide range of conditions, such as sender, recipient, size of the email, or keywords contained in the body;
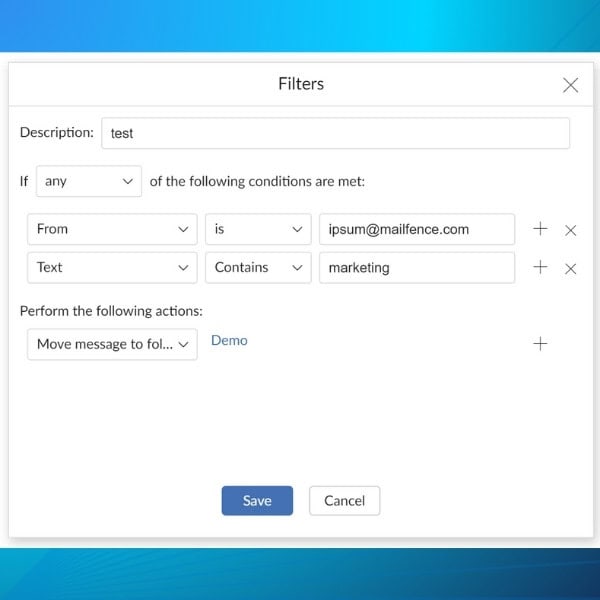
- if multiple conditions are set, you can choose if either all or any conditions need to be met;
- Define what action the filter will take, such as moving the email to a folder.
- Save the filter to activate it.
Looking to create an email account with no phone number required? Check out our latest guide here.
Common Parameters of an Email Filter
Based on the email service you use, the parameters you can play with will vary. However, let’s cover the most common ones and how you can use them.
Types of rules
The most common conditions you can set are:
- Subject: does the subject line contain a specific word? With Mailfence, you can even decide if there should be an exact match or not, if the Subject line should begin or end with a specific word, etc.
- From: condition based on who sent the email;
- To: who the email is sent to;
- Text: condition based on the content of the email (you can set a specific word or a full phrase);
- Size: condition based on the size of the email (in KB);
- All Emails: you can bypass this step so that your filter applies to all emails indiscriminately;
Types of actions
The most common actions you can apply to an email are:
- Move to Folder: the most common action is to sort the email into a specific folder when the condition(s) is met;
- Forward a copy to another email address;
- Delete the email;
- Send an automatic reply;
- Assign a tag;
- Mark the email as read.
There are many more types of conditions and actions that you can explore in your Mailfence account in order to create extremely precise filters.
7 Tips to Get the Most Out of Email Filtering
Now that you know how to set up filters, here are seven tips to fine-tune your system for maximum productivity.
1. Combine Filters with Folders
One of the best ways to manage your inbox is by pairing filters with folders. For example, create folders based on projects, clients, or types of emails, like newsletters or receipts. Then, set filters to automatically route emails to the appropriate folder. This keeps your inbox clutter-free and makes it easier to find specific messages when needed.
2. Prioritize Important Emails
Create filters that flag or move high-priority emails to a separate folder for immediate attention. For instance, you can set filters for emails from your boss, specific clients, or messages containing urgent keywords. This helps you stay on top of the most critical communications without being bogged down by less important ones.
3. Use Keywords in Filters
In addition to filtering by sender or subject line, consider using keywords to help manage emails more efficiently. If you often receive emails related to specific projects, set filters to flag or categorize those emails based on project-specific keywords. This will help keep your inbox organized and make it easier to track project-related communications.
4. Filter Out Spam and Unwanted Emails
While most email services have built-in spam filters, you can improve this by setting up your own rules. If you frequently receive promotional emails or newsletters that you no longer find useful, create filters to send these directly to a “Trash” or “Spam” folder. This reduces clutter and minimizes distractions.
5. Organize Emails by Date or Time
Setting up filters to organize emails by when they were sent can be incredibly helpful, especially if you receive a lot of time-sensitive communications. For example, you can create a filter to move emails received in the past 24 hours to a priority folder, ensuring you focus on the most current emails while leaving older ones for later.
6. Review and Adjust Filters Regularly
As your email needs evolve, it’s important to review and update your filters. Projects may end, clients may change, and your priorities may shift. Every few months, revisit your filters to ensure they still serve your needs and tweak them as necessary to stay organized.
7. Use Multi-Step Filters for Complex Actions
Many email platforms allow for multi-step filters, meaning you can set up a single rule to perform multiple actions. For example, you might want certain emails to be forwarded to a colleague and then automatically archived in a folder. By using these more complex filters, you can further streamline your inbox management.
That’s it for this Guide on Email Filtering!
That’s a wrap for this guide on email filtering! We hope you found it useful, and will now be able to efficiently use email filters to boost your productivity.
Got any questions? Anything we missed out on? Drop us a line at support@mailfence.com – or visit our Knowledge Base.
FAQs: Email Filtering Tips
Email filtering automates actions on emails based on rules you set. For example, it can move emails to specific folders, delete them, or mark them as read. Filtering saves time, keeps your inbox organized, reduces distractions, and improves productivity.
Creating a filter varies by email provider, but the general process involves defining conditions (e.g., sender, subject line) and actions (e.g., move to a folder, delete). In Mailfence, filters are created under “Settings > Filters” where you can customize parameters like sender, keywords, or email size.
Filters can be based on the sender, subject line, recipient, keywords in the email body, or even the size of the email. You can also apply actions such as moving to a folder, forwarding, deleting, or tagging emails.
To get the most out of filters, combine them with folders for organization, prioritize important emails, use keywords to categorize messages, and review your filters regularly to ensure they align with your current needs.


